
Introduction:
Form validations in any applications are like assures that a valid data is storing on servers. All programing frameworks have their own individual implementations for form validations. In Dotnet Core MVC application server-side validations carried on by the models with the help of Data Annotations and the client-side validations carried by the plugin jQuery Unobtrusive Validation. jQuery Unobtrusive Validation is a custom library developed by Microsoft based on the popular library jQuery Validate.
In this article, we are going to learn how the model validation and client-side validation works in Asp.Net Core MVC Application with sample examples.
Getting Started:
Let's create an Asp.Net Core MVC application project using preferred editors like Microsoft Visual Studio or Microsoft Visual Studio Code. Here I'm using Visual Studio.

Let's create an MVC controller and name it as 'PersonController.cs' and add an action method as below.
PersonController.cs:
PersonController.cs:
using Microsoft.AspNetCore.Mvc;
namespace MvcValidation.App.Controllers
{
    [Route("person")]
    public class PersonController : Controller
    {
        [HttpGet]
        [Route("create")]
        public IActionResult Create()
        {
            return View();
        }
    }
}
Add MVC View name as 'Create.cshtml' which is furnished with a form to validate.Views/Person/Create.cshtml:
@model Person

<div>
    <form asp-action="create-post">
        <div class="form-group row">
            <label asp-for="Name" class="col-sm-2 col-form-label">Name</label>
            <div class="col-sm-10">
                <input asp-for="Name" type="text" class="form-control" />
                <span asp-validation-for="Name" class="text-danger"></span>
            </div>
        </div>
        <div class="form-group row">
            <button type="submit" class="btn btn-primary">Submit</button>
        </div>
    </form>
</div>
'Person' will be the model for the 'Create.cshtml' view. In the form, we can observer MVC Tag Helpers like 'asp-action', 'asp-for', 'asp-validation-for' will be discussed in much more details in later steps.Now Add Model 'Person.cs' which binds or holds the form data.
Models/Person.cs:
using System.ComponentModel.DataAnnotations;
namespace MvcValidation.App.Models
{
    public class Person
    {
        public string Name { get; set; }
    }
}
Now Observer Html above, MVC Tag Helpers value assigned is "Name" which is from the 'PersonModel'. Similarly, we have to bind properties from model class with the Html to consume the validation benefits provided by Dotnet Core.Now run the application and navigate to "https://localhost:44397/person/create"


Configure Server-Side Validations:
Asp.Net Core MVC server-side validation done by Data Annotations in which the properties for the form need to configure validation, those properties will be decoration with validation Attribute. Here are some built-in validation attributes provided by Dotnet Core:
- [Compare] - validates two properties of a model match.
- [EmailAddress] - validates that the property has a valid email format.
- [Phone] - validates that the property has a valid phone number format.
- [Range] - validates that the property value fallen within the specified range values.
- [RegularExpression] - validates that the property has satisfied the given regular expression.
- [Required] - validate that the property has some value, can not be null or empty.
- [StringLength] - validate that the property value length should not exceed the length specified.
- [Remote]- validates the input on the client, by calling the action method on the server through AJAX.
These Attribute [AttributeName(ErrorMessage= "custom message")] might allow optional input parameters to override default functionality, for example, they allow us to input error message to override the default one.
Let's add [Required] attribute to 'Name' property in Person Model. Update the code as below
Models/Person.cs:
[Required]
public string Name { get; set; }
Now Test the sample application again and open browser developer tools then inspect the form element. We can observe after adding validation attribute, in the Html input field two more 'data-{something}' attributes are added like 'data-val' and 'data-val-required'.
PersonController.cs:
[HttpPost]
[Route("create-post")]
public IActionResult Create(Person person)
{
 if (!ModelState.IsValid)
 {
  return View(person);
 }
 return Content("Success");
}
- In this Post action method, model validation can be check by using 'ModelState' which depends on the form model (our example Person.cs is form model).
- If model valid we returning some success string (in the real-time application based on the application requirement redirected to success view ) if validation fails then pass the model to view 'Create.cshml'. Because we are passing the model object which is invalid passing to the 'create.cshml', now the error messages will be displayed.


Client Validation Using jQuery Unobtrusive Validation:
jQuery Unobtrusive Validation is a front-end validation library developed Microsoft. Using client-side validation benefits the application by reducing its number of round-trips to the server. Validating page without reloading page also looks like much more user-friendly applications.
- Most work of this jQuery Unobtrusive Validation depends on the Html data attributes (like 'data-{someAttribute}' ).
- jQuery Unobtrusive Validation parses the data- attribute and passes the logic to jQuery validation. 'data-value' attribute set true( means 'data-val = true') makes the field is ready or configured to get validated by jQuery Unobtrusive Validation.
- When the field is ready to validate, the field must also contain data- attribute rule means 'data-val-ruleName' and value for this attribute will be the error message for this validation.
- jQuery Unobtrusive Validation has been configured to deal with some default data- attribute rules (one example like data-val-required=" filed must be required").
- The field can contain additional values while validating can be passed via data- attribute rule parameter(like 'data-val-rulename-parameter1='5'')
- Note:- From the above points we conclude that data- attributes used by jQuery Unobtrusive Validation, either we have to write every attribute manually on Html or if we can recall this article MVC Tag Helpers like 'asp-for', 'asp-validation-for' are helping to generates data- attributes dynamically on rendering the page.
Now to consume jQuery Unobtrusive Validation, when we create Asp.Net Core MVC template Project it's automatically adding those files in '_ValidationScriptsPartial.cshtml'.
Views/Shared/_ValidationScriptsPartial.cshml:

Now load this partial script on to the 'Create.cshmtl' as below
Create.cshtml:
@section  Scripts{

@await Html.PartialAsync("/Views/Shared/_ValidationScriptsPartial.cshtml")
}
Now let's add data- attributes in the form manually, update the input field in the form as belowCreate.cshtml:
<div class="col-sm-10">
 <input type="text" class="form-control input-validation-error"
 data-val="true"
 data-val-required="The Name field is required."
 id="Name" name="Name" value="">
 <span class="text-danger field-validation-error"
 data-valmsg-for="Name"
 data-valmsg-replace="true">The Name field is required.</span>
</div>
Here I'm applying 'required' data- attribute rule which is default validation rule in jQuery Unobtrusive Validation library.
Let's disable the server-side validation by removing the [required] attribute on 'Name' property in the 'Person' Model
//[Required]
public string Name { get; set; }
Now if we test the application, validation will take place in the browser without posting the form to the server.
Need Both Client And Server-Side Validations? :
I suggest having both client and server-side validation makes a more assured way of submitting form data. Client-side validation really cut down a lot of server round-trips and looks more user-friendly. But there might be chances of by-passing client validations and submit data at times server-side help to guard.
Let's enable both client-side and server-side validation in our sample. Update the code as follows
Views/Person/Create.cshtml:
<label asp-for="Name" class="col-sm-2 col-form-label">Name</label>
<div class="col-sm-10">
 <input asp-for="name" type="text" class="form-control" />
 <span asp-validation-for="name" class="text-danger"></span>
</div>
Models/Person.cs:
[Required]
public string Name { get; set; }
Now if you test application, validation will be done by the browser. Let's by-pass javascript by blocking in the browser and now if you test validation will be done at the server-side. So we can understand how cool it is having both client-side and server-side validations.Block javascript in chrome browser:

Custom Attribute Validation:
We can write custom validation to implement our own logic. This custom validation can be done at the entire model level or particular property in the model. Here we are going to create a property level validation. For our sample, I'm creating a custom validation attribute for the input field value that should match with the string specified in the server.
Attributes/TextMatchAttribute.cs:
using System.ComponentModel.DataAnnotations;
using MvcValidation.App.Models;

namespace MvcValidation.App.Attribute
{
    public class TextMatchAttribute:ValidationAttribute
    {
        public string ExpectedText { get; set; }
        public TextMatchAttribute(string expectedText)
        {
            ExpectedText = expectedText;
        }

        public string GetErrorMessage() => $"Enter value should always be {ExpectedText}";

        protected override  ValidationResult IsValid(object value, ValidationContext validationContext)
        {
            var person = (Person)validationContext.ObjectInstance;
            if(string.IsNullOrEmpty(person.Name) || person.Name.ToLower() != ExpectedText.ToLower())
            {
                return new ValidationResult(GetErrorMessage());
            }
            return ValidationResult.Success;
        }
    }
}
Our TextMatchAttribute implement ValdiationAttribute (provide by DataAnnotation), then overrides IsValid() method where we write own logic for validation. This custom attribute takes input string, so the user entered value in the form must match with this string.Now use this custom attribute for 'Name' property in the 'Person' model class.
Models/Person.cs:
[TextMatch("Naveen")]
public string Name { get; set; }
Now test the application and navigate to "https://localhost:44397/person/create" and try to submit the form. You may wonder no client-side validation fired, immediately after hitting submit button page get post server(round-trips) and get server-side validations.
Client-Side Custom Validations:
Let's start by checking input field Html by opening developer tools as below

No data- attributes on the input field, will explain two conclusions. The first thing for custom validation attributes MVC Tag Helper has no idea of which type of data- attributes to be generated. The second thing is jQuery Unobtrusive Validation library contains all default attributes rule names like 'require', 'compare', etc so this explains they don't know how to deal with custom attributes.
Let's update the Html by adding data- attribute manually as below
Views/Person/Create.cshtml:
<div class="form-group row">
 <label asp-for="Name" class="col-sm-2 col-form-label">Name</label>
 <div class="col-sm-10">
  <input asp-for="Name"
      data-val="true"
      data-val-textMatch="Enter value should always be Naveen"
      data-val-textMatch-expectedText="Naveen"
      type="text" class="form-control" />
  <span asp-validation-for="Name" class="text-danger"></span>
 </div>

</div>
- data-val="true" enables field is ready to validate
- data-val-textMatch here 'textMatch' is the validation rule that needs to be registered in jQuery Unobtrusive Validation.
- data-val-textMatch-expectedText here 'expectedText' are like additional parameters in 'textMatch' validation rule
wwwRoot/js/customValidation.Js:
$.validator.addMethod('textMatch', function (value, element, params) {
    var txtValue = $(params[0]).val();
    console.log(txtValue);
    var expectedText = params[1];
    console.log(expectedText);

    if (!txtValue || !expectedText) {
        return false
    }

    return txtValue.toLowerCase() === expectedText.toLowerCase();
});
Here method with data- attribute rule name added to jQuery Unobtrusive Validation. This method holds the logic to custom validation.Now we need to register this method in jQuery Unobtrusive Validation adaptors as below
wwwRoot/js/customValidation.js:
$.validator.unobtrusive.adapters.add('textMatch', ['expectedText'], function (options) {
    var element = $(options.form).find('input#Name');

    options.rules['textMatch'] = [element, options.params['expectedText']];
    options.messages['textMatch'] = options.message;
});
Views/Person/Create.cshml:
@section Scripts{

    @await Html.PartialAsync("/Views/Shared/_ValidationScriptsPartial.cshtml")
    <script src="~/js/customValidation.js"></script>
}
Now test the application and our form gets validated on client-side without making round-trips to server for validations
Generate data- Html Attributes For Custom Validation Attributes From Server:
If we recall for Custom Validation for client-side we have added data- Html attributes manually. This can be done from the server-side dynamically with the following 2 approaches.
- Using AttributeAdapterBase<TAttribute>
- Using IClientModelValidator
Generate data- Html Attributes Using AttributeAdapterBase:
Attributes/TextMatchAttributeAdapter.cs:
using Microsoft.AspNetCore.Mvc.DataAnnotations;
using Microsoft.AspNetCore.Mvc.ModelBinding.Validation;
using Microsoft.Extensions.Localization;

namespace MvcValidation.App.Attribute
{
    public class TextMatchAttributeAdapter : AttributeAdapterBase<textmatchattribute>
    {
        public TextMatchAttributeAdapter(TextMatchAttribute attribute, IStringLocalizer stringLocalizer):base(attribute, stringLocalizer)
        {

        }

        public override void AddValidation(ClientModelValidationContext context)
        {
            MergeAttribute(context.Attributes, "data-val", "true");
            MergeAttribute(context.Attributes, "data-val-textMatch", GetErrorMessage(context));
            MergeAttribute(context.Attributes, "data-val-textMatch-expectedText", Attribute.ExpectedText);
        }

        public override string GetErrorMessage(ModelValidationContextBase validationContext)
        {
            return Attribute.GetErrorMessage();
        }
    }
}
- AttributeAdopterBase<TAttribute> is extended from Microsoft.AspNetCore.Mvc.DataAnnotations.
- The type of this Adapter is our custom validation Attribute.
- An override method 'AddValidation' is the place where we add our data- attributes render dynamically on page load
Attributes/CustomValidationAttributeAdapterProvider:
using System.ComponentModel.DataAnnotations;
using Microsoft.AspNetCore.Mvc.DataAnnotations;
using Microsoft.Extensions.Localization;

namespace MvcValidation.App.Attribute
{
    public class CustomValidationAttributeAdopterProvider: IValidationAttributeAdapterProvider
    {
        private readonly IValidationAttributeAdapterProvider baseProvider = new ValidationAttributeAdapterProvider();
        public IAttributeAdapter GetAttributeAdapter(ValidationAttribute attribute, IStringLocalizer stringLocalizer)
        {
            if(attribute is TextMatchAttribute textMatchAttribute)
            {
                return new TextMatchAttributeAdapter(textMatchAttribute, stringLocalizer);
            }
            return baseProvider.GetAttributeAdapter(attribute, stringLocalizer);
        }
    }
}
Now register this provider class in the ConfigureServices method in Startup.csStartup.cs:
services.AddSingleton<IValidationAttributeAdapterProvider, CustomValidationAttributeAdopterProvider>();Now remove all manually added data- attributes for custom validations from the Html as below
Views/Person/Create.cshml:
<div class="form-group row">
 <label asp-for="Name" class="col-sm-2 col-form-label">Name</label>
 <div class="col-sm-10">
  <input asp-for="Name" type="text" class="form-control" />
  <span asp-validation-for="Name" class="text-danger"></span>
 </div>

</div>
Now run the application and open developer tools then inspect elements, we can observe data- attributes for custom validation are bound from the server.

Generate data- Html Attribute Using IClientModelIValidator:
To follow this approach let's create a new custom validation attributes(here creating new custom validation attribute for code displaying purpose, if you want you can override previous custom validation attribute with this approach)
Attributes/TextMatch2Attribute.cs:
using System.Collections.Generic;
using System.ComponentModel.DataAnnotations;
using Microsoft.AspNetCore.Mvc.ModelBinding.Validation;
using MvcValidation.App.Models;

namespace MvcValidation.App.Attribute
{
    public class TextMatch2Attribute : ValidationAttribute, IClientModelValidator
    {
        public string ExpectedText { get; set; }
        public TextMatch2Attribute(string expectedText)
        {
            ExpectedText = expectedText;
        }

        public string GetErrorMessage() => $"Enter value should always be {ExpectedText}";
        public void AddValidation(ClientModelValidationContext context)
        {
            MergeAttribute(context.Attributes, "data-val", "true");
            MergeAttribute(context.Attributes, "data-val-textMatch", GetErrorMessage());
            MergeAttribute(context.Attributes, "data-val-textMatch-expectedText", ExpectedText);
        }
        protected override ValidationResult IsValid(object value, ValidationContext validationContext)
        {
            var person = (Person)validationContext.ObjectInstance;
            if (string.IsNullOrEmpty(person.Name) || person.Name.ToLower() != ExpectedText.ToLower())
            {
                return new ValidationResult(GetErrorMessage());
            }
            return ValidationResult.Success;
        }

        private bool MergeAttribute(IDictionary<string, string> attributes, string key, string value)
        {
            if (attributes.ContainsKey(key))
            {
                return false;
            }

            attributes.Add(key, value);
            return true;
        }
    }
}
Here custom attributes extend ValidationAttribute class to implement custom validation logic and it also implementing IClientModelValidator which helps to bind data- attributes to the Html.Update Model class to use this new custom validation attribute as follows
Models/Person.cs:
[TextMatch2("Iron Man")]
public string Name { get; set; }
Now run application and inspect Html elements, we can see data- attributes render to the Html elements.Dynamic Form Validation Using jQuery Unobtrusive Validation:
Some times we may need to load a form dynamically load the form, for those forms validation will not work like forms loaded on-page. But we have the option to add validation to forms loaded through AJAX call by parsing them by jQuery Unobtrusive Validation.
Add a new action method in PersonController.cs as below
PersonController.cs:
[HttpGet]
[Route("test-page")]
public IActionResult TestPage()
{
 return View("Test");
}
Views/Person/Test.cshml:
<div>
    <div class="row">
        <div class="col col-sm-12">
            <button type="button" class="btn btn-primary" id="loadform">Load Form And Add Dynamic Validations</button>
        </div>
    </div>
    <div class="row" style="margin-top:10px">
        <div class="col col-sm-12">
            <div id="form-container">

            </div>
        </div>
    </div>

</div>
@section Scripts{

    @await Html.PartialAsync("/Views/Shared/_ValidationScriptsPartial.cshtml")
    <script src="~/js/customValidation.js"></script>
    <script src="~/js/dynamicForm.js"></script>
}
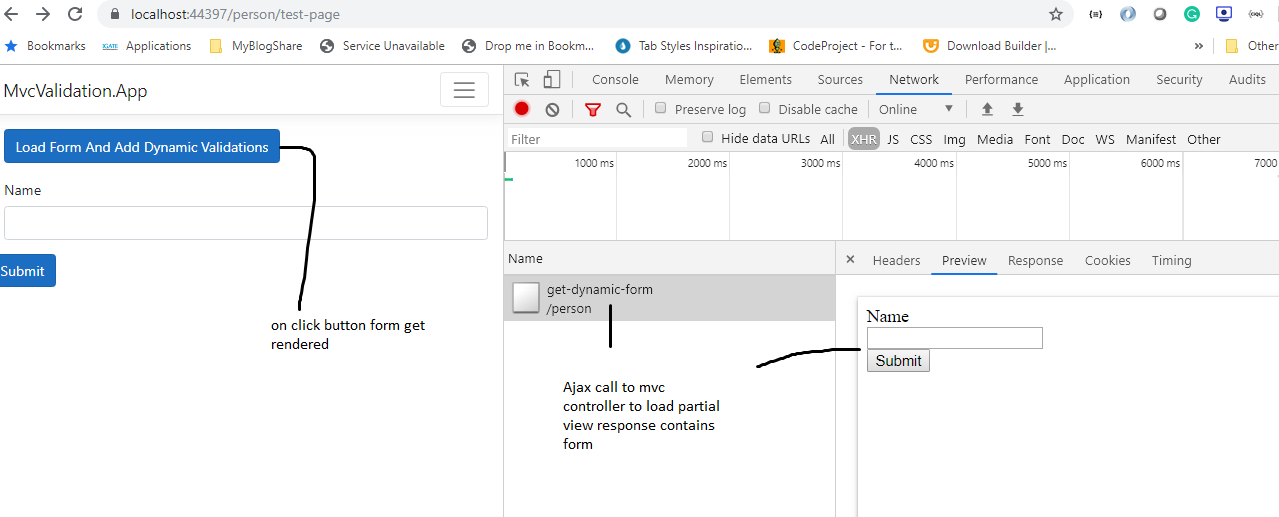
Here on this page, we have a button on clicking it loads form by AJAX Call and then it will be rendered inside the div with an id of 'form-container'.wwwRoot/js/dynamicForm.js:
$("#loadform").click(function () {
    $("#form-container").html('');
    $.get({
        url: "https://localhost:44397/person/get-dynamic-form",
        dataType: "html",
        error: function (jqXHR, textStatus, errorThrown) {
            alert(textStatus + ": Couldn't add form. " + errorThrown);
        },
        success: function (newFormHTML) {
            var container = document.getElementById("form-container");
            container.insertAdjacentHTML("beforeend", newFormHTML);
            var forms = container.getElementsByTagName("form");
            var newForm = forms[forms.length - 1];
            $.validator.unobtrusive.parse(newForm);
        }
    })
})
Here we are calling an MVC action method that delivers partial view which contains a form that will be returning as a response. '$.validator.unobtrusive.parse('yourform')' this method helps to parse the form Html and activate the client-side validations.Now add a new action method in PersonController.cs that delivers partial view
PersonController.cs:
[HttpGet]
[Route("get-dynamic-form")]
public IActionResult DynamicForm()
{
 return PartialView("DynamicPartilForm");
}
Views/Person/DynamicPartilForm.cshtml:
<div>
    <form >

        <div class="form-group row">
                <label  class="col-sm-2 col-form-label">Name</label>
                <div class="col-sm-10">
                    <input
                           id="Name",
                           name="Name"
                           data-val="true"
                           data-val-textMatch="Enter value should always be Naveen"
                           data-val-textMatch-expectedText="Naveen"
                           type="text" class="form-control" />
                    <span class="text-danger field-validation-valid" data-valmsg-for="Name" data-valmsg-replace="true"></span>
                </div>

            </div>
        <div class="form-group row">
            <button type="submit" class="btn btn-primary">Submit</button>
        </div>
    </form>
</div>
Now run the application and navigate to "https://localhost:44397/person/test-page" which show as below

Summary:
We have covered server-side validation and client-side validation and then discussed custom validation attributes creation. we have manually written the logic for custom validation at the client-side with the help of the jQuery Unobtrusive Validation library. We learned about validation sync between server-side and client-side using data- attributes. Finally we hands-on dynamic forms client-side validations.
ReplyDeleteA very good very detailed blog, thanks to this article, I have understood the logic of validation using whatever server or client side, content to clarify us subtle congratulations thank you again